
Priya wanted to email twelve holiday photos to her grandmother, but each one straight off her phone was 4032 x 3024 pixels and around 3 MB, so the message bounced. Learning how to resize an image properly solved it in a few minutes: she chose a new width, let the height follow automatically, and the photos still looked sharp on a tablet.
This guide covers the one formula that stops pictures stretching, the pixel sizes that suit websites, email and prints, and the steps on Windows, Mac and in your browser.
Quick answer: To resize an image, pick a new width in pixels and keep the aspect ratio locked so the height changes in proportion. New height = original height x new width / original width. A 4032 x 3024 photo resized to 1600 pixels wide becomes 1600 x 1200. Shrink images freely, but avoid enlarging past the original size.
In This Guide
How to resize an image without stretching it
To resize an image without stretching it, change the width and the height by the same proportion, which is what the “keep aspect ratio” or “lock” option does for you. Stretching happens when only one side changes, so faces look wide or buildings look thin.
When you need to set both numbers yourself, use this sum:
- Divide the new width by the original width to get the scale. For Priya, 1600 / 4032 = 0.397.
- Multiply the original height by the same scale. 3024 x 0.397 = 1200.
- Round to a whole pixel and check the result keeps the original shape, here 4:3.
The ratio calculator for scaling dimensions does steps 1 and 2 instantly when the numbers are awkward. If the shape has to change, for example from a 4:3 photo to a square profile picture, crop first and then resize. Cropping cuts away the edges you do not need; resizing should only ever scale what is left.

Which size should you resize a photo to?
The right size depends on where the photo will be seen: 1200 to 1600 pixels wide is plenty for email and blog posts, 1920 pixels wide covers a full width website banner on most laptops, and printing needs far more, roughly 300 pixels for every inch of paper.
| Where the image will be used | Common target width | Why |
|---|---|---|
| Email attachment | 1200 to 1600 px | Sharp on a phone or tablet, small enough to send |
| Blog or article image | 1200 px | Matches most content column widths at high density |
| Full width website banner | 1920 px | Covers a typical laptop or desktop screen |
| Social share preview (Open Graph) | 1200 x 630 px | The widely used size for link previews |
| Profile picture | 400 x 400 px | Displayed small and usually cropped to a circle |
| Photo print at 6 x 4 in | 1800 x 1200 px | 300 pixels per inch for a crisp print |
Treat these as practical targets rather than fixed rules, because each platform resizes uploads again in its own way. For the web, a smaller pixel count means a smaller file and a faster page, which matters on mobile data.
How does resizing change file size and quality?
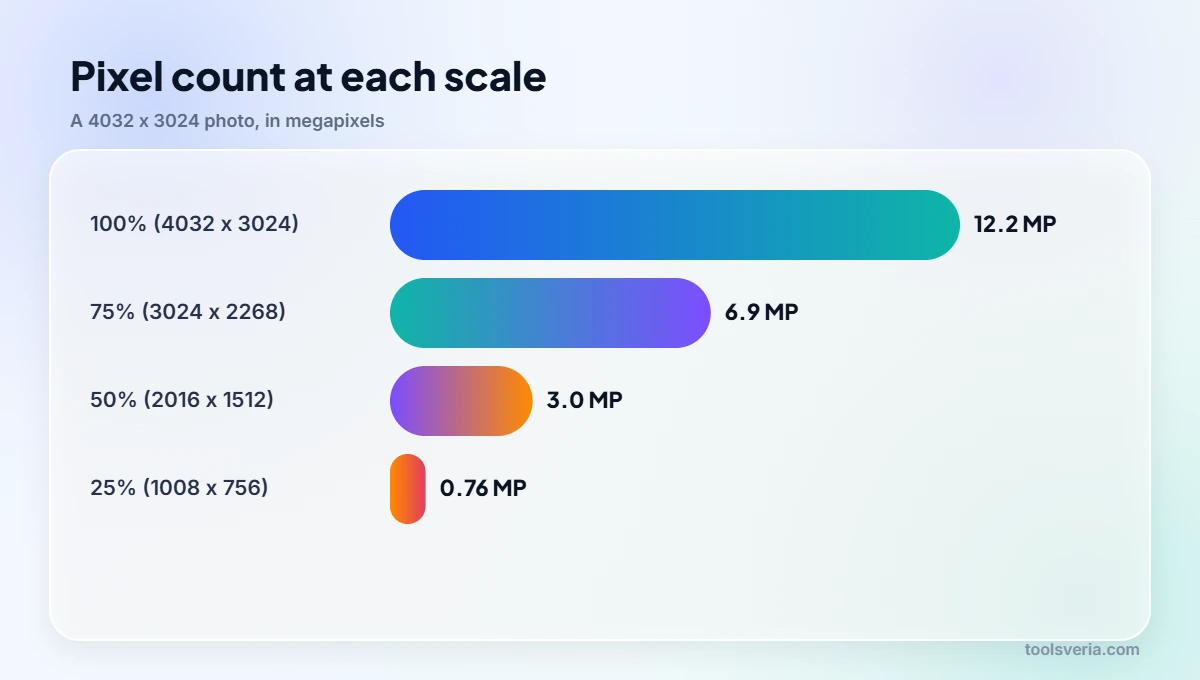
Resizing changes file size because the number of pixels falls with the square of the scale: halving the width and height leaves only a quarter of the pixels, so the file usually shrinks to around a quarter too. Priya’s 4032 x 3024 photo holds about 12.2 million pixels. At 50% it holds about 3.0 million, and her 1600 x 1200 version keeps just 15.7% of the original pixels.
Quality survives shrinking well, because the software blends neighbouring pixels into fewer, slightly larger ones. A little sharpening after a big reduction can bring back crisp edges, and most editors offer it as a separate step.
Enlarging is the opposite story. Resampling cannot recover detail that was never captured, so a 1008 x 756 thumbnail stretched to full size looks soft and blocky. If you need a large version, go back to the original file instead. The background to the different scaling methods, from nearest neighbour to bicubic, is covered well in the Wikipedia article on image scaling.
What is the difference between pixels, DPI and print size?
Pixels describe how much detail an image holds, while DPI or PPI only describes how tightly those pixels are packed when the image is printed. Changing a photo from 72 to 300 ppi without changing its pixel dimensions makes no difference at all on a screen.
For print, the sum is simple: pixels needed = print size in inches x ppi. A 6 x 4 inch print at 300 ppi needs 1800 x 1200 pixels. Working in centimetres, divide by 2.54 first, so a 15 cm edge is 5.91 inches and needs about 1772 pixels at 300 ppi. Our guide on converting centimetres to inches covers that step with more examples.
Run it the other way to see how big a photo can print. Priya’s 4032 x 3024 original divided by 300 gives 13.44 x 10.08 inches, about 34 x 26 cm, before quality starts to drop. Most photo labs accept 150 ppi for large prints viewed from a distance, which doubles the size you can get away with.

How do you resize an image on Windows, Mac and online?
Every major system can resize a picture without extra software, and the steps are short. Whichever you use, tick the option to keep the aspect ratio and save the result as a copy so the original stays untouched.
- Windows: open the photo in Paint, choose Resize (Ctrl+W), pick Pixels, tick “Maintain aspect ratio” and type the new width.
- Mac: open it in Preview, go to Tools, then Adjust Size, make sure “Scale proportionally” is ticked and enter the width.
- GIMP (free, any system): choose Image, then Scale Image, keep the chain icon linked and set the width.
- In your browser: drop the file into the free online image resizer, set a width, height or percentage and download the copy.
Browser tools that process images on your own device are the quickest option for one or two files and keep private photos private, since nothing leaves your computer. For whole folders, the batch features in desktop editors save time. If you need the result as text for a web page or email template, the image to Base64 converter turns the resized file into a data string.
Key points
- Keep the aspect ratio locked so the height changes in proportion to the width.
- New height = original height x new width / original width.
- A 4032 x 3024 phone photo resized to 1600 px wide becomes 1600 x 1200.
- Halving both sides leaves a quarter of the pixels and usually about a quarter of the file size.
- Prints need about 300 pixels per inch, so 6 x 4 inches needs 1800 x 1200 pixels.
Key Image Resizing Terms Explained
These terms come up every time you work out how to resize an image, whether the result is for a website, an email or a printed photo.
- Pixel dimensions
- Pixel dimensions are the width and height of an image counted in pixels, such as 4032 x 3024 for a typical 12 megapixel phone photo. They decide how large the picture appears on a screen.
- Aspect ratio
- Aspect ratio is the proportion between width and height. A 4032 x 3024 photo has a 4:3 ratio, so any resized copy that keeps the same shape must stay at four units wide for every three units tall.
- Resampling
- Resampling is the process of recalculating pixels when an image changes size. Shrinking throws pixels away and blends their colours, while enlarging has to invent new pixels, which softens edges and detail.
- Pixels per inch
- Pixels per inch, or ppi, sets how many image pixels fit into one inch of a print. At 300 ppi a 6 x 4 inch print needs 1800 x 1200 pixels, while screens ignore the setting.
- Upscaling
- Upscaling means enlarging an image beyond its original pixel dimensions. Standard resizing cannot add real detail, so a 1008 x 756 copy stretched back to 4032 x 3024 will look noticeably blurred.
Frequently Asked Questions
My photo looks squashed after I changed the width. What went wrong?
The aspect ratio was unlocked, so only one side changed. Undo it, tick “keep aspect ratio” and enter the width again. For a 4032 x 3024 photo set to 1600 wide, the height should read 1200.
Can I make a small image bigger without it going blurry?
Not with ordinary resizing. Enlarging forces the software to invent pixels, so a 1008 x 756 copy blown up to 4032 x 3024 looks soft. Go back to the original file, or accept a smaller display size.
Does changing 72 dpi to 300 dpi make my picture sharper?
No. Changing the dpi setting alone keeps exactly the same pixels, so the image looks identical on screen. It only changes the printed size: 1800 x 1200 pixels prints at 6 x 4 inches at 300 ppi, or 12 x 8 inches at 150 ppi.
What size should a photo be before I email it?
Around 1200 to 1600 pixels wide works well for email. It looks sharp on phones and tablets and usually brings a 3 MB phone photo down to a few hundred kilobytes, so a dozen pictures fit comfortably in one message.
Should I crop or resize first when making a square profile picture?
Crop first, then resize. Cropping turns the 4:3 photo into a square without distorting anyone’s face, and resizing afterwards scales that square down to something like 400 x 400 pixels for the profile slot.
Is it safe to resize private photos with an online tool?
It depends on where the processing happens. Tools that work inside your browser, like ours, never upload the file, so it stays on your device. Services that upload images to a server should state how long they keep them.
Priya’s twelve photos went through in one email at 1600 x 1200 pixels each, and the originals stayed safely on her phone for printing later. Keep the ratio locked, size for the screen or the paper, and resizing becomes a thirty second job. Guidance checked October 2026.